Export data out of Xcelsius dashboards
Accessing data in Xcelsius is pretty easy. You can have static data loaded from Excel, or dynamic data loaded through Web Services, Excel XML Maps, QaaWS (Query as a Web Service), Crystal Reports, Web Intelligence Reports or queries using Live Office.
There are however only a few ways to export data from Xcelsius. Either we could use Flash variables or use the XML Data Button to export data out of the compiled .swf file.
Here I present a simple method to export data from an Xcelsius .swf to a csv/Excel file. This method utilizes the XML Data Button’s capability to send and receive XML data.
The source code is provided at the end of this post as a download. Copy the code from the PDF and save as export2csv.aspx on the web server.
Note that this is an ASP.Net (.aspx extension) file, which works with an IIS Web Server. If you wish to use this code, please remember to change the links to point to your webserver and the appropriate directories. For being able to write the exported data to a directory, you may need to grant Write access to the IUSR_ account to allow anonymous access.
After you’ve placed the export2csv.aspx file on your webserver, perform the following steps in your XLF file.
-
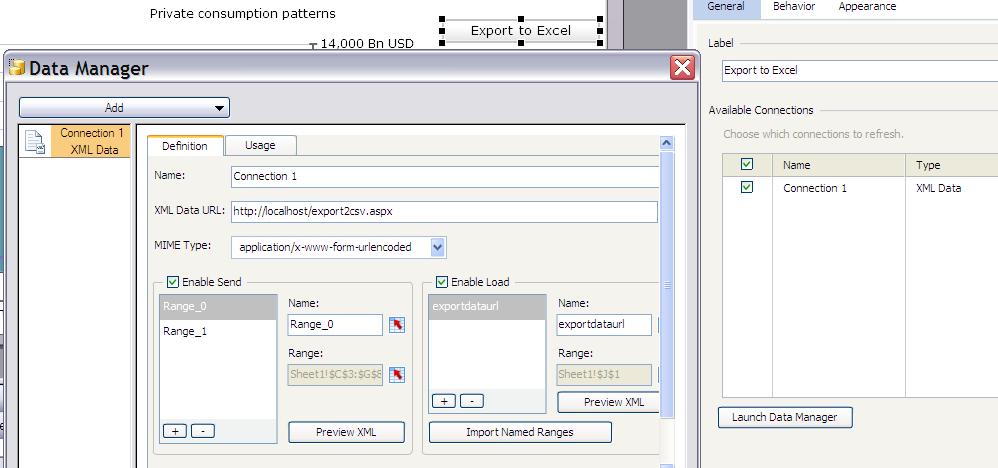
Add an XML data button [ Xcelsius 4.5 ]/Connection Refresh button [ Xcelsius 2008 ] and check the “Enable Send” box. Make sure that in the MIME Type dropdown, “application/x-www-form-urlencoded” is selected.

-
Type out the URL of the export2csv.aspx file in the XML Data URL and add the ranges of data that you need to export. The screenshot above shows 2 ranges being exported.
-
Check the “Enable Load” box and add a single cell range (Sheet1!$J$1 in the example) to receive the URL of the CSV file that will be returned by the export2csv.aspx file. Note that the XML variable name returned by the export2csv.aspx is exportdataurl, so you need to name the range the same. If you wish to change the name, you’ll need to update the same in the export2csv.aspx file.

-
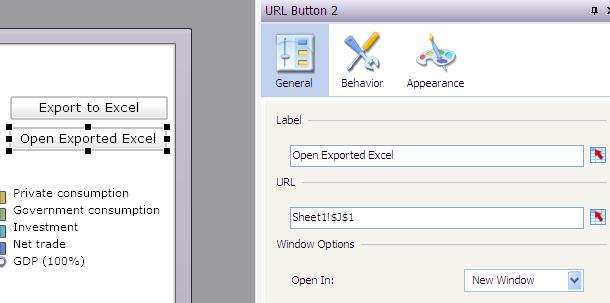
Add a URL link button and set its URL to the cell defined in the previous step (Sheet1!$J$1)
-
Export the .swf file and try out exporting the data by clicking on the Connection Refresh Button and then opening the file by clicking on the URL link Button.
Now you can easily export data from any .swf that you’ve created in Xcelsius.
How does this work?
-
The XML Data Button exports the ranges you’ve selected in an XML file to our export2csv.aspx file.
-
Our export2csv.aspx file parses and saves this XML in a .csv format on the web server.
-
The path of the .csv file is returned to the .SWF file through the “Enable Load” range.
-
The URL Link component retrieves the URL from this cell and opens the .CSV file when clicked.
Source code:
<%@ Page Language="VB" aspcompat=true Debug="true" validateRequest="false"%>
<%@ Import Namespace="System.IO" %>
<%@ Import Namespace="System.Xml" %>
<%@ Import Namespace="System.Xml.XPath" %>
<%

'-----------------------------------
'Name: export2csv.aspx
'Author: Maloy Manna
'Date: 04.26.2008
'Purpose: To export data out of Xcelsius .swf in csv format
'Input: Xcelsius data manager Send ranges in XML format
'Output: CSV output file URI
'Last Modified:
'Modification:
'-----------------------------------

'Variable declarations
Dim sXMLString as String
Dim sFormitem as String
Dim sFileName as String
Dim sRPath as String
Dim sPath as String
Dim sXML as String
Dim iRangeLength As Integer
Dim iRowLength As Integer
Dim iRangeCounter As Integer
Dim iCounter As Integer
Dim oFile as File
Dim oWrite as StreamWriter
Dim oXML as Object
Dim oRNodeList as Object
Dim oRNode as Object
Dim oNodeList as Object
Dim oNode as Object

'Get XML that was sent from SWF file
For Each sFormItem In Request.Form
	sXMLString = sXMLString & sFormItem & " = " & Request.Form(sFormItem)
Next

'Load XML into object
oXML = Server.CreateObject("MSXML2.DOMDocument")
oXML.async = False
oXML.validateOnParse = False
oXML.loadXML(sXMLString)

'Create output file with timestamp in the name
sFileName ="Exported_Data_" & DatePart("m",Now()) & DatePart("d",Now()) &DatePart("yyyy",Now()) & DatePart("h",Now()) & DatePart("n",Now()) &DatePart("s",Now()) & ".csv"
oWrite= oFile.CreateText("C:\Inetpub\wwwroot\" & sFileName)

'Use XPath to get the data
'Find the number of ranges or variables to be exported
sRPath ="/data/variable"
oRNodeList = oXML.documentElement.selectNodes(sRPath)
iRangeLength = oRNodeList.Length

For iRangeCounter = 0 to iRangeLength - 1
	oRNode = oXML.documentElement.selectSingleNode("/data/variable["+CType(iRangeCounter,String)+"]/row")

'Write out the data set forthe range
sPath = "/data/variable["+CType(iRangeCounter,String)+"]/row"

'Find the number of rows for the range
oNodeList = oXML.documentElement.selectNodes(sPath)
iRowLength = oNodeList.Length
For iCounter =0 to iRowLength - 1
	oNode = oXML.documentElement.selectSingleNode("/data/variable["+CType(iRangeCounter,String)+"]/row["+CType(iCounter,String)+"]/column")
	oWrite.Write(oNode.text)
	While Not(oNode.nextSibling Is Nothing)
		oWrite.Write("," +oNode.nextSibling.text)
		oNode = oNode.nextSibling
	End While
	oWrite.WriteLine
Next

'Write a blank line before the next range starts
oWrite.WriteLine
Next
oWrite.Close()
'Build XML data to return
sXML = "<data>"

'exportdataurl
sXML = sXML & "<variable name=" + chr(34) + "exportdataurl" + chr(34) + ">"
sXML = sXML & "<row>"
sXML = sXML & "<column>" & "http://localhost/" & sFileName& "</column>"
sXML = sXML & "</row>"
sXML = sXML & "</variable>"

'close out the XML data string
sXML = sXML & "</data>"

'Set the Response type
Response.Buffer = True
Response.ContentType = "application/vnd.csv"
Response.Write(sXML)
%>
Download code as PDF: Code for export2csv.aspx
Update on 06 September 2009:
Several of you have asked me for the JSP version of the export code. Unfortunately, I don’t have the expertise to do this in JSP, but fortunately Luca Spinelli and Ivan Aguilar from ClearPeaks have created the JSP version. The .war file is available for free if you send an email to info@clearpeaks.com (I’m unable to include the .war file it here due to lack of compressed file extension support in Wordpress). Please get in touch with ClearPeaks, if you want the source code.
-Maloy
comments powered by Disqus